

Run a python app (or script) as a systemd service
This post shows how you could run a python script on a Raspberry Pi as a systemd service that is running Debian. This method will also work with a laptop or computer running Ubuntu or Debian.
Running as a script a systemd service means that the script will automatically run when the machine boots and it will be restarted even if it crashes for any reason. Basically, it will be running forever.
I used the excellent dietpi that truly brings lightweight justice to you Raspberry Pi.
Test method: Telegram Bot
We are going to use a very basic Telegram bot in order to test that our script will:
- Automatically start when the machine boots
- Automatically restarts when it crashes/exits for whichever reason
If the bot is alive, then it means that our method works. Of course, we will also be able to check the status of the service through systemd, but just to be sure … This bot is going to send us a message through Telegram once its online. If you are not interested in the bot, you should still be able to use this for some other python script.
- Create a ~/Temp folder on your Raspberry Pi through SSH
- Create a virtual environment in ~/Temp (you might need to install
sudo apt-get install python3-venv):dietpi@solidsnake:~/Temp$ python3 -m venv .env -
Load the virtual environment:
source .env/bin/activate - Let’s also update pip, and install a package we need here:
(.env) dietpi@solidsnake:~/Temp$ pip install --upgrade pip (.env) dietpi@solidsnake:~/Temp$ pip install pytelegrambotAPI - Create a
bot.pyfile:(.env) dietpi@solidsnake:~/Temp$ nano bot.py
Let’s give our bot:
- A help message
# -*- coding: utf-8 -*-
import telebot

# initialize the bot connection
bot = telebot.TeleBot("PUT_YOUR_BOT_TOKEN_HERE")

# this function will send Help! if you send it the string
# `help` or `aide`
@bot.message_handler(commands=['help', 'aide'])
def send_welcome(message):
    text = """
Help !
"""
    bot.reply_to(message, text)

# this is how the bot is constantly listening to you messages
bot.polling()
In order to create the bot on the Telegram network and get your PUT_YOUR_BOT_TOKEN_HERE, you wlll need to interact with the botfather (here is a basic tutorial in case you get stuck with this step, stop after section Copy the access token). Send a message to your bot (which is currently an empty shell) using its username once you create it.
- Test your script:
python bot.py
If everything worked fine, you should be able to send /help to your bot, and your bot will answer you.
Let’s now make this script into a systemd service.
On Dietpi
Important
All the paths in your scripts have to be absolute paths, there can be no relative path in your scripts. If there are relative paths that you must keep, you will have to change your current working directory by retrieving
- Modify the python script, add first line:
#!/home/dietpi/Temp/.env/bin/python3which is the path to the python in the virtual env chmod +x bot.pyto make it executable, it will execute with the python you specified in the previous step, which the python you installed in your vritual environment. You can try this by directly running./bot.pywithout any python before it, it should run the script.- Type the following command in your terminal to add a
systemdservice:sudo systemctl edit --force --full dummy.serviceYou will then automatically be taken to a terminal text editor. Paste the following content :
[Unit]
Description=Dummy Service
Wants=network.target
After=network.target

[Service]
ExecStartPre=/bin/sleep 10
ExecStart=/home/dietpi/Temp/bot.py
Restart=always

[Install]
WantedBy=multi-user.target
Save and exit using Ctrl+X then Y, followed by Enter, if your default terminal editor is nano, otherwise, good luck.
-
Note that ExecStart is the path to the Python file directly if you made it an executable using the right virtual environment. If you did not, then you have to specify a python binary to execute it.
-
We have to add an ExecStartPre delay otherwise the service keeps trying to start before internet is even available and we get this error:
● dummy.service
   Loaded: loaded (/etc/systemd/system/dummy.service; enabled; vendor preset: enabled)
   Active: failed (Result: exit-code) since Tue 2019-10-29 00:26:18 GMT; 5min ago
  Process: 442 ExecStart=/home/dietpi/bot/bot.py (code=exited, status=1/FAILURE)
 Main PID: 442 (code=exited, status=1/FAILURE)

Oct 29 00:26:18 solidsnake bot.py[442]:     timeout=(connect_timeout, read_timeout), proxies=proxy)
Oct 29 00:26:18 solidsnake bot.py[442]:   File "/home/dietpi/bot/.env/local/lib/python2.7/site-packages/requests/sessions.py", line 465, in request
Oct 29 00:26:18 solidsnake bot.py[442]:     resp = self.send(prep, **send_kwargs)
Oct 29 00:26:18 solidsnake bot.py[442]:   File "/home/dietpi/bot/.env/local/lib/python2.7/site-packages/requests/sessions.py", line 573, in send
Oct 29 00:26:18 solidsnake bot.py[442]:     r = adapter.send(request, **kwargs)
Oct 29 00:26:18 solidsnake bot.py[442]:   File "/home/dietpi/bot/.env/local/lib/python2.7/site-packages/requests/adapters.py", line 415, in send
Oct 29 00:26:18 solidsnake bot.py[442]:     raise ConnectionError(err, request=request)
Oct 29 00:26:18 solidsnake bot.py[442]: requests.exceptions.ConnectionError: ('Connection aborted.', gaierror(-3, 'Temporary failure in name resolution'))
Oct 29 00:26:18 solidsnake systemd[1]: dummy.service: Main process exited, code=exited, status=1/FAILURE
Oct 29 00:26:18 solidsnake systemd[1]: dummy.service: Failed with result 'exit-code'.
- We also add a Restart flag in order to get systemd to always restart the script if it were to ever fail
Use Ctrl X + Y to save and exit when you finished editing.
- Enable the service:
sudo systemctl enable dummy.service - Reboot, wait for 30 seconds
- Try to contact your bot with
/help, All good ! - SSH into your RPi
- Check your service status:
sudo systemctl status dummy.service - Manipulate your service:
sudo systemctl stop dummy.service #To stop running service sudo systemctl start dummy.service #To start running service sudo systemctl restart dummy.service #To restart running service - Let’s validate that it will really restart on crash. Let’s add a function to our bot that simply kills the script. By killing, I mean that we are going to create an error in order to get the script to crash. When we are working on a telegram bot script, each function is kind of loaded separately, we are going to create an error in a new function and use it to check if the bot truely restarts, add this:
#!/home/dietpi/Temp/.env/bin/python3
# -*- coding: utf-8 -*-
import telebot

# initialize the bot connection
bot = telebot.TeleBot("TELEGRAM_BOT_TOKEN")

# this function will send Help! if you send it the string
# `help` or `aide`
@bot.message_handler(commands=['help', 'aide'])
def send_welcome(message):
    text = """
Help !
"""
    bot.reply_to(message, text)

# never do this (again)
@bot.message_handler(commands=["kill"])
def get_kill(message):
    print(a)

bot.polling()
If you try ths script (in your Virtual Environment not as a service), you will see that the script will return the /help command, but it will simply crash if you try to run the /kill command which tries to print a variable a that was never defined. Because python sees each telegram bot function as a separate function, it does not check that all variables exist before, as a variable can be defined with an incoming Telegram message.
- Deploy (copy/paste) this new script on the Raberry pi, then reboot the RPi, so it properly loads as the new systemd service
- Wait for 30 seconds, then contact your bot using
/helpto check that it is online - Use the kill command, the bot should die, wait for a bit more than 10 seconds, as we have a 10 second timer set prior to starting the script
- Try
/helpagain, IT WORKS!
In order to delete the service:
sudo systemctl disable dummy.service
then reboot.
🎇🔥 And that’s it ! 🔥🎇 You should now be able to run any python script forever.
If you liked this post, you can share it with your followers or follow me on Twitter!
Exploring the evolution of Open Access publications with Arcas
Arcas is a python tool designed to help with collecting academic articles from various APIs. This means that you can use Arcas from python (or the terminal) in order to quickly search and collect publications based on detailed queries. Currently, Arcas supports IEEE, PLOS, Nature, Springer and arXiv.
I actually found about Arcas more than a year ago and was eager to try it out but could not find the time to do so. Recently, I have been working on publications that aims at exploring the publication, open source software and experimental data publishing. I’ve been using get_papers, which is a part of the CORE tool chain or mostly scripts I wrote myself to interact with arXiv, IEEE or Elsevier’s API (elsapy), but I decided to try Arcas and share my notes while doing so here.
Arcas is being developed and maintained by Nikoleta Glynatsi, who’s doing a pretty good job at it. The documentation is pretty exhaustive, and the code is commented. I will be focusing on interacting with Arcas through python mostly as I am interested in manipulating the data once we receive it. Let’s go ahead and install the package in a clean virtual environment:
ilyass@tx1:~/Temp/test_arcas$ python3 -m venv .env
ilyass@tx1:~/Temp/test_arcas$ source .env/bin/activate
(.env) ilyass@tx1:~/Temp/test_arcas$ pip install arcas
We’re now ready to play a bit with Arcas. Let’s first open a python interactive console and try the first step of the Arcas documentation in order to check that everything is working fine:
(.env) ilyass@tx1:~/Temp/test_arcas$ python
Python 3.6.8 (default, Apr  9 2019, 04:59:38)
[GCC 8.3.0] on linux
Type "help", "copyright", "credits" or "license" for more information.
>>> import arcas
>>> api = arcas.Arxiv()
>>> parameters = api.parameters_fix(title='composites', abstract='composites', records=10)
>>> url = api.create_url_search(parameters)
>>> request = api.make_request(url)
>>> root = api.get_root(request)
>>> raw_articles = api.parse(root)
We first import arcas in this example and create an api object for the Arcas Arxiv API. We can then define parameters for our query. In this example, I have specified conditions for the title and abstract fields of our query. It is also possible to specify conditions for the author, year, journals and other fields. The complete list is available in the search fields category of the documentation.
I have also specified that we would like to retrieve the 10 first articles returned by this query. This example is pretty much what the documentation shows. Let’s take a look at the result we get from arcas, raw_articles:
>>> len(raw_articles), type(raw_articles)
(10, <class 'list'>)
The result is a list that contains 10 elements, we can guess that these are the 10 records we requested. If we print one of them (using print(raw_articles[2]) for example), the result we’ll see is the raw answer of the API regarding this specific article. Such a result is not easy to read for us as it might be XML, JSON or other structured language used by the API. In addition, each API (IEEE, Nature, Springer,…) will have their own format through which they will send us their answer. This is really not convenient as I might want to retrieve papers from several APIs and to be able to explore them all together. This is where Arcas becomes really interesting. Arcas can automatically convert any article from one of the APIs it supports to a pandas object. The api object we have previously created contains a method designed to do so:
>>> article = api.to_dataframe(raw_article[0])
>>> type(article)
<class 'pandas.core.frame.DataFrame'>
>>> article
         key                        unique_key                    title         author                                           abstract  date journal provenance
0  Akama1997  172a6c24fff3783f785606bf2931f581  Compositeness Condition  Keiichi Akama    By solving the compositeness condition, unde...  1997   arXiv      arXiv
>>> article.title
0    Compositeness Condition
Name: title, dtype: object
After converting an article to a pandas dataframe, we can easily explore various attributes of each article, such as the title.
If an article has several authors, Arcas will automatically generate a pandas dataframe with several lines, where each line is for one of the authors, for example for the second in this dataset:
>>> article = api.to_dataframe(raw_article[2])
>>> article
              key                        unique_key              title             author                                           abstract  date journal provenance
0  Bellazzini2014  a3f60c11239e469784336afb07fa385f  Composite Higgses  Brando Bellazzini    We present an overview of composite Higgs mo...  2014   arXiv      arXiv
1  Bellazzini2014  a3f60c11239e469784336afb07fa385f  Composite Higgses        Csaba Csáki    We present an overview of composite Higgs mo...  2014   arXiv      arXiv
2  Bellazzini2014  a3f60c11239e469784336afb07fa385f  Composite Higgses         Javi Serra    We present an overview of composite Higgs mo...  2014   arXiv      arXiv
Everything seems to be working fine for me, except that my article dataframe does not have as many columns as the developers seem to have in the first tutorial of the documentation. For example, I could not find a way (yet) to access the open_access column that is specified as being available in the previously linked tutorial and in the results set. After some looking around, I have eventually realized that the documentation and the source code on Github are currently different from the version of the source code available through pip. The pip version is an older version as it does not seem to contain the modifications allowing us to explore various columns from the dataframe such as open_access and a few others. If you would likes to access those fields, you should uninstall Arcas using pip and clone the latest version from the Github repository (that’s what I did), you can then install it using the provided setup.py. Update 2019-11-12: @NikoletaGlyn kindly updated the pip repository after I opened an issue about this, the documentation available in ReadTheDocs is now in sync with the latest versions available through pip or Github. You should be able to access all the columns through the pip version. The pip repository was updated within 18 hours of the creation of the issue.
We are otherwise able to use Arcas to perform queries over a specific API. This is already interesting as we can use Arcas to download articles from a single author and automatically analyze their most used keywords in the title, in the abstract, their publication frequency per year, etc …
Arcas can also be used to retrieve papers from several APIs and can then be used to explore them all together. This usage is detailed in second and third tutorials of the documentation.
I have decided to try to plot the amount of open access article available through some of the APIs for each year. I need to be sure that the open_access column will not return Not available since I have noticed that for the Nature API returned Not available for all publications, which also mean that I will not be able to use Nature for this.
It is possible to explore the source code of each API in Arcas to determine if the developers are expecting it to return something relevant or not. This file is the one that manages the IEEE API for example. Doing so shows that arXiv, IEEE and Springer are the only APIs that should be considered. So, I created a Springer and IEEE API account and used the key with Arcas. I wrote a script that was heavily inspired from the example provided by the developers (also very cool from them to have examples, in addition to a nice documentation and comments).
My script tried to download about 201 publications from arXiv and Springer (I eventually had to remove IEEE as I could not get it to work). The query specified that the title or abstract should be related to “composite”, “carbon” or “fiber” which, I hope, should restrict the result to publications about composite materials made of carbon fibers. I tried to download more than 201 publications but consistently got a 504 error during the Springer API query, so I settled for 201 and decided that it would be a diverse enough sample for tonight. The script is available here, you are going to need matplotlib in addition to Arcas of course.
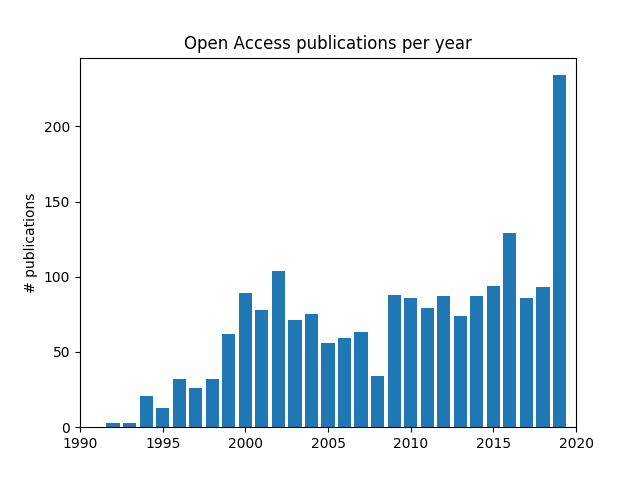
The plot I am showing might seem interesting, as it might show a steady increase in the availability of open access publications through the nineties, an stable consolidation during the 2000s followed by a surprising increase in 2020, which would have been great. However, this plot was made by using about 201 publications from each API of which the arrangement is unknown. Each API returned a set of publications without specifying how those publications were selected. It still seems to be a pretty cool example that shows how a package such as Arcas could be used to explore the publishing ecosystem of your community.
If you liked this post, you can share it with your followers or follow me on Twitter!
Stream Raspberry Pi microphone through Wifi
The goal of this article is to show how you can easily stream the sound captured by a microphone connected to the Raspberry Pi to another distant machine. In order to do this, you will need:
- Raspberry pi 3
- Microphone (I used this one )
- USB soundcard (I used )
We’ll also need the vlc package, you can download/install that on your Raspberry Pi using:
sudo apt-get install vlc
Next, you should plug your USB sound card to the RAspberry Pi and plug the microphone to the USB soundcard. We can then check if the Raspberry Pi sees the USB soundcard using:
pi@raspberrypi:~ $ cat /proc/asound/modules
This command should show that the Raspberry pi detected two soundcards:
0 snd_bcm2835
1 snd_usb_audio
Now let’s check that the microphone part of the USB soundcard is properly detected:
pi@raspberrypi:~ $ arecord –l

**** List of CAPTURE Hardware Devices ****
card 1: Device [USB PnP Sound Device], device 0: USB Audio [USB Audio]
Subdevices: 1/1
Subdevice #0: subdevice #0
The Raspberry Pi is here showing that the microphone plugged to the soundcard is detected as device 0, plugged to soundcard 1.
We can then test this microphone, first by simply recording a few seconds and checking that it works:
arecord -D hw:1,0 -d 10 -f cd test.wav -c 1
Ẁhere:
-D: We want to use a recording deviceHw:1,0: We’ll use device 0 plugged to soundcard 1-d 10: We’ll record 10 seconds of sound-f cd test.wav: The file will be saved in the current folder, and will be namestest.wav-c 1: Use 1 if you are using a mono microphone, 2 for stereo
After 10 seconds, you should have control over the prompt again, and you can listen to the recodring using:
aplay test.wav
(If your Raspberry Pi is plugged to a TV using HDMI the defaul sound output will be the HDMI) If you are able to listen to the sound recorded by the mic and it seems fine, we can now try to send it over the network.
The first method we can try is to simply send the uncompressed audio feed from the microphone using SSH tunneling:
arecord -D plughw:1,0 -f dat | ssh -C user@remoteip aplay -f dat
Where user@remoteip are the SSH credentials of the distant machine on the network that you’d like to stream the feed to. You will not need to do anything on the distant machine (except turning ON the audio), the feed will automatically start. The distant machine needs to have SSH activated.
This solution induces a latency, on my Raspberry Pi, of about 1-5 seconds and appears to consume quite a lot of CPU reesources.
Another solution, which appears to be more efficient, consists in compressing the feed in MP3 before sending it over the network. This is possible using VLS and the RPT protocole, you can simply input:
cvlc -vvv alsa://hw:1,0 --sout \
 '#transcode{acodec=mp3,ab=128}:rtp{mux=ts,dst=239.255.1.1,sdp=sap}'
In this case, the audio feed will be sent as an 128kbps MP3 feed to the 239.255.1.1 destination. To access it, input rpt://239.255.1.1 in the network feeds of VLC on any machine connected to the same network.
The audio feed should then start on VLC.
I have sources for this and will add it later._
If you liked this post, you can share it with your followers or follow me on Twitter!
Scholarly communication & open access: what researchers should know with Vincent Larivière
This is a cross-post from Colper Science The original post is at http://blog.colperscience.com/2018/02/16/lariviere-talk/.
McGill will celebrated the Open Access Week International (October 23-29 2-17) with events designed to bring awareness to newer aspects of the scholarly communication lifecycle. Vincent Larivière, Canada Research Chair in the Transformations of Scholarly Communication and associate professor of information science at the École de bibliothéconomie et des sciences de l’information (l’Université de Montréal) gave a talk entitled “Scholarly communication and open access: what researchers should know”.
The complete presentation is available here and we recommend that you take a look at the slides while listening to the first half of this episode, which is the first section of Vincent Larivière’s presentation. We will discover how publishing in researcher became what it is today and an explanation of how having five big companies dominate this field affects researchers.
In the second part of this episode, we will present a short interview we had with Vincent Lariviere about an interesting event which happened here, at Université de Montreal, during the summer of 2017: the library’s university refused to renew one of the big deals it had with Taylor and Francis Group and had to go through tough negotiations with the publisher. Vinvent Lariviere was part of these negotiation and will tell us a little bit more about the role he played there.
If you liked this post, you can share it with your followers or follow me on Twitter!
Making experimental results citable with Zenodo: PMMA tensile test
A quick post to share an experiment, again, I did a few months again. This is a very “basic” test in which pull on a PMMA “dogbone” until it breaks. The specimen is being pulled at a constant loading speed of 2000N every minute. The stress strain plot is also presented here. An interesting fact to notice here is that the DIC method was able to capture the different in elastic and plastic deformation at the very end of the test (the very last point of the plot).

If you would like to learn more about the DIC method, please check one of my previous posts about it, like this one.
This test’s were of interest to some fellow researchers but I had no plan publishing them or anything, I was still interested in sharing these results and getting some “credit” for it (“credit”, in research, is usually understood as citations). This is, I believe, a pretty big issue for experimental researchers as only publications seem to matter in research, the Open Data for Experimental Mechanics project is actually focused on this issue. A solution for experimental researchers is to upload their dataset on the Zenodo platform. A DOI is then attributed to the dataset and the experimental results can be cited by other researchers, even if there is no paper attached to the experimental results.
![]()
If you liked this post, you can share it with your followers or follow me on Twitter!
Chitosan film DIC measurement while damage is happening
A quick post to share an experiment I did back in 2016 in cooperation with Qinghua Wu. Qinghua’s research is mainly about 3D-printing chitosan, a natural polysacharride which is the structural element in the exoskeleton of shrimps and other crustaceans. Chitosan has several very nice properties, it is completely natural, it is biocompatible and is an antibacterial agent. However, it has the big disadvantage of only being able to sustain low loads especially when it is hydrated. Qinghua is also able to 3D print films of this polymer using the solvent cast 3D-printing method so we decided to investigate how a crack grows in this material.
We took a rectangular shaped film of chitosan, and covered it with a mist of black paint dots using and air gun. We then precracked it using a razor blade. The material is then inserted in a tensile testing machine and a stereocamera rig was setup in front of the tensile testing machine.
The black paint dots were used as a speckle pattern for the DIC algorithm after the test. It was thus possible to obtain the displacement and strain fields while the crack is growing.
If you liked this post, you can share it with your followers or follow me on Twitter!
Open Data for Experimental Mechanics: From idea to project
This is a cross-post from opendataexpmechanics.github.io. The original post is at opendataexpmechanics.github.io. The purpose of this post is to introduce a new open source project I will be working on during the next year with Patrick Diehl.
Context and background
Patrick and I, Ilyass, met in March 2015 through Twitter. We started exchanging about Peridynamics, a novel theory for modelling of materials in mechanics. I was, and still am, extremely interested in that theory as it appeared to be a theory upon which a model could be built to perform simulation of some complex experiments I was working on. We started working around this theory, I went to Patrick’s lab in Germany as an invited researcher, and Patrick is now a fellow in the laboratory I am part of at Polytechnique Montreal.
In our every day work, I mostly do experimental work, I set up experiments involving several materials being pulled and broken apart while measuring displacements and loads; Patrick, on the other hand, mostly focuses on programming and implementing models to perform the best possible simulations of the experiments I setup in the laboratory. It is through this workflow that we started realizing that other publications about similar experiments did not contain enough information to completely model the experiment or reproduce it. The complete raw experimental data is usually not available, and, when it is possible to get the raw data, it is quite hard to work with since there is no standardized format to present that data. The experiments we do in the laboratory also started to appear less and less valuable, the only thing that appeared to be really valuable are the publications which could be written out of the experimental data.
A few weeks ago, we heard of the Mozilla Science Mini-Grants and decided to try to use this opportunity to setup a project addressing these issues. We worked hard to be able to send a grant demand to the Mozilla foundation and decided to share some of the answers we sent to the foundation in this blog, which will also be used to track the project’s progress.
The issues
The availability of experimental results is limited, because they are scattered in publications. The access to experimental data could be beneficial for mechanical engineers and computational engineers to improve their research. In publications details necessary to reproduce the experiment or design the simulation for a benchmark are often missing. A platform is therefore needed to share experimental data sets in mechanics, rating it with respect to reproducibility and quality of the experimental setup for benchmarks with simulation results. Thus, both communities could enhance the understanding of material behavior and fasten their research.
First project description
Accessible reliable and fully described experimental data is critically lacking in the materials/mechanics community to validate accurate predictive models. Our project proposes a platform for researchers to present their experimental results as standardized datasets. Experimental researchers can then obtain a DOI for their datasets, making them citable by others.
Coming up with a solution
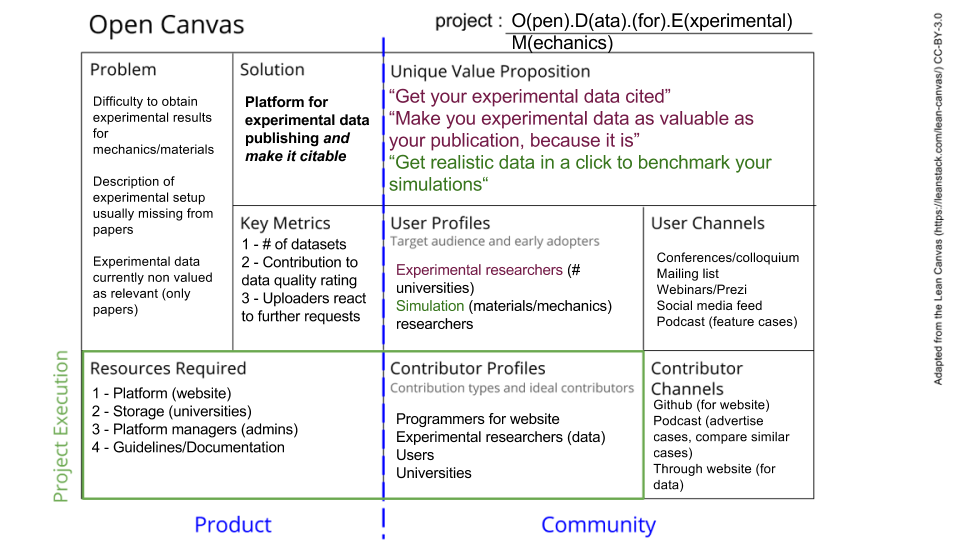
We used the Open Canvas designed by the Mozilla Foundation to try to clearly define the project we would work on. The canvas helps linking a product, which solves a problem, to users and contributors. Contributors are critical for any open source project, which is why they are included in this canvas. The canvas summarizes the whole project’s purpose.
Users
Experimental engineers will benefit from sharing their results by getting citations. It could be a motivation to provide their data on our platform. Computational engineers could use this data as benchmarks for their simulations and rating the data could improve the quality and make it more valuable for the community.
Description of the platform
The current form we have in mind for the project is a web platform. The platform itself will be a repository for datasets for experimental mechanics and materials. Users will be able to upload a PDF document clearly explaining the experiment and the data format. The experiment’s raw data itself will be either stored on our servers, if the total size is not too large, or stored on a University’s servers and linked to them. Other users will be able to login and research through the datasets available by category, kind of tests, materials and other classifiers to be determined later. The data can directly be downloaded by the user.
Planning
- Phase 1 - Initial platform development
During the next months, we will firstly be working on developing an initial version of the platform. Once we have a first functional version, we will move to the second phase.
- Phase 2 - Platform/repository launch
The platform’s code will be made public on Github in our repository. The platform will also be officialy launched. At that point, we will start looking for contributors to help us develop the platform and include new features. We will start advertising the platform to try to get more experimental results available for the users.
- Phase 3 - Sustaining the platform and advertising it
During the last phase, we will keep working on the previously mentionned activities and will also start focusing on means to make the platform sustainable. We will also focus on monitoring the platform to measure and quantify the outputs to see if we are reaching the objectives we defined at the beginning of the project.
If you liked this post, you can share it with your followers or follow me on Twitter!