

Colper Science: Open Access and Non-Traditional Scholarly Communications with Jane Burpee
Colper Science is a podcasting project Kambiz Chizari and I started during the Mozilla Sprint 2017.

Colper Science a bi-weekly podcast about Open Science and its methods. Each episode is an interview with someone somewhoe related to Open Science. We believe that is today possible for researchers to fully migrate to the world of Open Science using tools and methods already available out there, but most of these tools, methods and possibilities remain unknown by most of the research community. Colper Science’s purpose is to let everybody know about these tools by sharing success stories around Open Science.
Listen to Episode 01:
Bonus:
More information about the episode, links, references, … Also more information about Colper Science.
Subscribe to the podcast’s RSS feed.
If you liked this post, you can share it with your followers or follow me on Twitter!
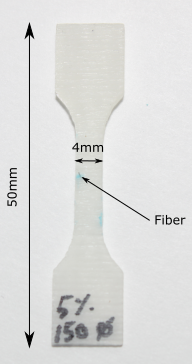
Photoelastic view of dogbone specimen containing bundle of Carbon Fibers
I manufactured a standard dogbone specimen similar to the one shown in the picture below sometime last year. Instead of using a plain monofiber, I decided to embed a Carbon Fiber (CF) bundle in it. I found some CF in our laboratory at Polytechnique and worked on a method to manufacture the specimen I had in mind.
The setup used here is the same as the one presented in the post Optical microscope Digital Image Correlation. In the GIF clip above, the specimen is shown first, and the bundle of carbon fiber going through it are indicated with a metallic ruler I am holding. The next scene shows the microtensile testing rig installed under the Olympus confocal laser microscope, a specimen is shown while being tested. In the final scene, the computer screen plugged to the microscope is shown. It is possible to see a PTFE fiber in an epoxy matrice while interfacial debonding it starting to happen. That was the specimen I was testing at the moment I shot this clip.
The specimen was loaded in the microtensile testing machine, the whole rig is put under the confocal laser microscope after what the test started. These kind of tests take about 8 hours long: the specimen is loaded displacement by pulling on the microtensile testing machine by a step inferior to (\(100 \mu m \), the microtensile testing machine is then stopped and a picture is snapped with the confocal laser (a single picture takes about 3 minutes because of the confocal scanning process). The specimen is then pulled again and these steps are repeated until a crack is observed. The purpose of this test is to observe crack initiation and propagation inside a bundle of CF. For this specimen, I stopped the test when the crack was large enough to cover the whole field of view, but before it broke the specimen in two separate parts. I then used some photoelastic film again (similar to the one presented in this post) and glued it on both sides of the specimen. The photoelastic film reveals the strain field within a polymer, the more fringes are visible in an area the higher the strian field is (more explanation were provided in this post).
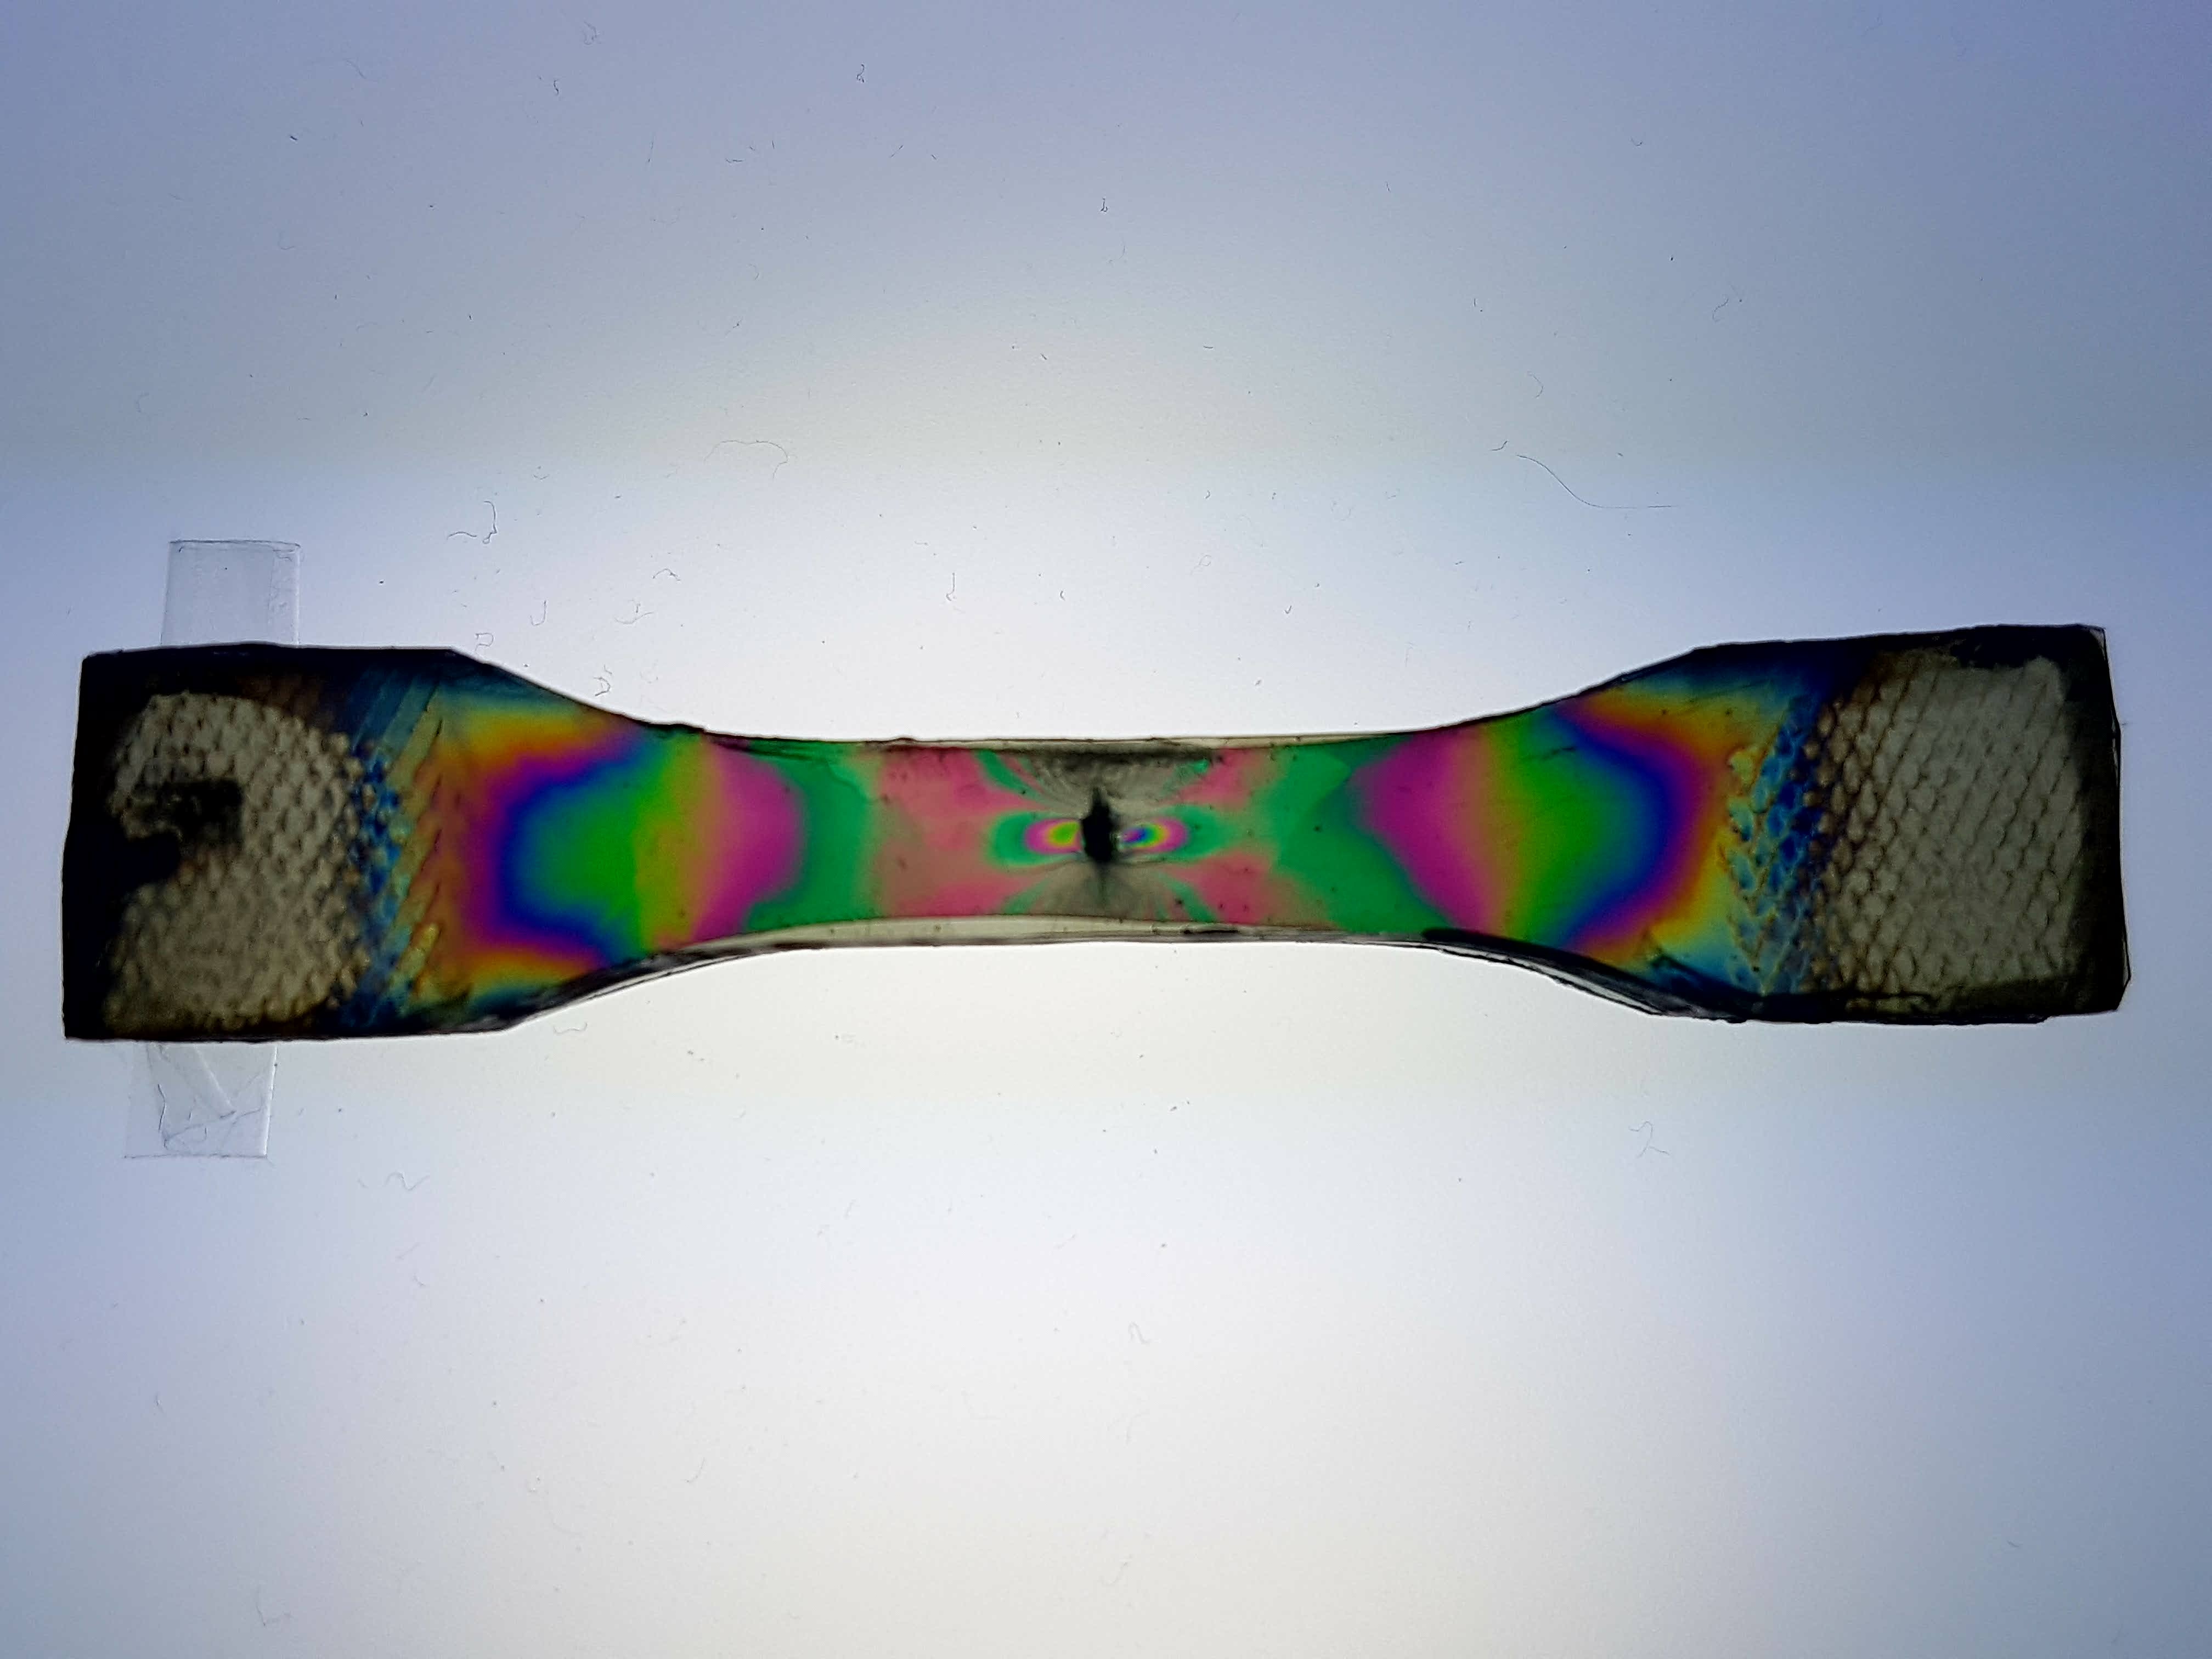
The result reveals the residual stresses remaining in the specimen after this test. It is possible to see how the CF bundle affected the strain field in its vicinity. The final purpose of this experiment is to somehow come up with a method to perform DIC on the images obtained using the confocal laser microscope.
These experiments were done with the help of Damien Texier and were done at École de Technologie Supérieur, Montréal.
If you liked this post, you can share it with your followers or follow me on Twitter!
Explore scientific publications
Lately, I have been exploring methods to extract large amount of data from scientific publications as part of my work with Kambiz Chizari for the Colper Science project, the Mozilla Open Science Labs 2017 and some future works we intend to do with the Nalyze team.
In this post, I explore 3 packages offered by the Content Mine group: getpapers, ami and norma. These 3 packages should allow us to download large sets of papers about a certain subject, normalize the obtained data to better explore it and then start analyzing using basic tools such as word counts and regular expressions.
The first consists in getting the scientific papers, to do so, we need to get started with getpapers.
You can get getpapers in one of the ContentMine organization repositories,
clone the repo, cd into the folder and use:
sudo npm install --global getpapers
to install the package. The package is used for: “getpapers can fetch article metadata, fulltexts (PDF or XML), and supplementary materials. It’s designed for use in content mining, but you may find it useful for quickly acquiring large numbers of papers for reading, or for bibliometrics.” (from the repo)
We are going to try to investigate Polycaprolactone (PCL) and FDM 3D printing. PCL is an interesting polymer because it is biodegradable and has a very low melting temperature (60\(^o\) C), which means that it can easily be remodeled by hand, simply by pouring hot water on it. The subject I am interested in here is FDM 3D printing of PCL, mostly for biomedical applications.
We are fist going to try using EuropePMC, a repository of open access scientific data (books, articles, patents…). EuropePMC is attached to PubMed, and I quickly realized that it seems to mostly host papers about medical and biomedical applications (that is why our research will be focused on biomedical applications).
The first thing we need to do is query EuropePMC to obtain a list of papers which contain the words in our query. Since we would like to have the papers about 3D printing and PCL, these are going to be the words in our query. The default API used by getpapers is EuropePMC, otherwise, it is also possible to use IEEE or ArXiv.
The query we will try will be:
ilyass@ilyass-PC:~/Repositories/getpapers$ getpapers -q 'PCL 3D print' -n -o '3DPCL'
-nruns the query in no-execute mode, which means that nothing will actually be downloaded, but the number of results found will be returned.-qis the query itself-ois the output folder for the query
ilyass@ilyass-PC:~/Repositories/getpapers$ getpapers -q 'PCL 3D print' -n -o '3DPCL'
info: Searching using eupmc API
info: Running in no-execute mode, so nothing will be downloaded
info: Found 57 open access results
Now, we simply need to use the same command again, without the -n flag to download the results. It is necessary to add the-x flag, which will download the full text article in the .XML structured format (we need to analyze the data later). It is possible to add a -p to the command to automatically download the PDF files for the request. When I tried it for this request, 8 papers among the 57 found had no PDF files available.
Run it:
ilyass@ilyass-PC:~/Repositories/getpapers$ getpapers -q 'PCL 3D print' -o '3DPCL' -p -x
(It might take a while depending of how many papers your request yields)
Take a look at the data:
ilyass@ilyass-ThinkPad-X1:~/Repositories/getpapers/3DPCL$ tree
3DPCL/
├── eupmc_fulltext_html_urls.txt
├── eupmc_results.json
├── PMC2657346
│   ├── eupmc_result.json
│   └── fulltext.pdf
├── PMC2935622
│   ├── eupmc_result.json
│   └── fulltext.pdf
├── PMC3002806
│   └── eupmc_result.json
...
eupmc_fulltext_html_urls.txtcontains the list of URLs for all articleseupmc_results.jsoncontains the result from the API, it is the best place to start exploring the data. Each paper is aJSONobject, with an author, abstract, etc…- Then, there is a folder for each paper, and each folder contains a
eupmc_result.jsonwhich is basically theJSONobject from the mastereupmc_result.jsonfile. It will also containfull_text.pdfandfull_text.xmlif you used the-pand-xflags.
Now that we have the data, we need to normalize it to ScholarlyHTML. Most APIs (wether it is PubMed, ArXiv, EuropePMC or others) will return data in different structured formats. ScholarlyHTML is a common format designed to explore data from any of these APIs.
To convert the data we have, we need norma. In order to install it, head to the releases on the Github repository and install the .deb package on your Linux machine using: sudo dpkg -i <norma.deb file>
Then use it with:
ilyass@ilyass-PC:~/Repositories/getpapers$ norma --project 3DPCL -i fulltext.xml -o scholarly.html --transform nlm2html
-iprovides the input file names in each folder in the project folder-ois the desired name for the Scholarly output
Now if you take a look at your data again:
3DPCL
├── eupmc_fulltext_html_urls.txt
├── eupmc_results.json
├── PMC2657346
│   ├── eupmc_result.json
│   ├── fulltext.pdf
│   ├── fulltext.xml
│   └── scholarly.html
├── PMC2935622
│   ├── eupmc_result.json
│   ├── fulltext.pdf
│   ├── fulltext.xml
│   └── scholarly.html
├── PMC3002806
│   └── eupmc_result.json
...
There is a scholarly.html file for each folder where there is also a fulltext.xml.
The scholarly.html file is a document you can open and explore with your web browser.
The next step is now to analyze the data we have in such a way that it makes your future readings more efficient, faster and to find the papers you should really read throughly among all the ones we found.
To do so, we are going to try the ami package. It is a collection of plugins designed to extract specific pieces of information called facts. Currently, ami plugins appear to be optimized to extract facts about genes, proteins, agronomy, chemical species, phylogenetics, some diseases. There are no plugins for engineering or material sciences (yet), so we will use two basic plugins for now to try to get some insights about our data: word frequencies and regular expressions (regex).
But first, install it by downloading the latest .deb package release here and install it using sudo dpkg -i <.deb file>.
Now let’s run a basic word frequency plugin from ami on our data:
ilyass@ilyass-PC:~/Repositories/getpapers$ ami2-word --project 3DPCL -i scholarly.html --w.words wordFrequencies
If you look at your data again:
3DPCL/
├── eupmc_fulltext_html_urls.txt
├── eupmc_results.json
├── PMC2657346
│   ├── eupmc_result.json
│   ├── fulltext.pdf
│   ├── fulltext.xml
│   ├── results
│   │   └── word
│   │       └── frequencies
│   │           ├── results.html
│   │           └── results.xml
│   └── scholarly.html
...
results.htmlfile which shows the frequency of each word in each article using a cloud of words (the size of word depends of its frequency)results.xmlwhich shows the occurence of each word:
<?xml version="1.0" encoding="UTF-8"?>
<results title="frequencies">
 <result title="frequency" word="and" count="370"/>
 <result title="frequency" word="the" count="278"/>
 <result title="frequency" word="for" count="106"/>
 <result title="frequency" word="printing" count="97"/>
 <result title="frequency" word="tissue" count="83"/>
 ...
The problem, as you might have noticed, is that common words (such as and or the) are faking our results. We can get rid of them thanks to a stopwords list. I wrote a very simple python script which writes the stopwords from nltk/corpora to a text file which can then be used by ami. The script can be found here, and its result, the text file containing all the stopwrods can directly be downloaded here.
We can launch again the word counter plugin with the stopwords:
ilyass@ilyass-PC:~/Repositories/getpapers$ ami2-word --project 3DPCL -i scholarly.html --w.words wordFrequencies --w.stopwords stopwords.txt
The results obtained this time are more interesting since they only contain relevant words:
 <?xml version="1.0" encoding="UTF-8"?>
<results title="frequencies">
 <result title="frequency" word="tissue" count="53"/>
 <result title="frequency" word="cell" count="50"/>
 <result title="frequency" word="cells" count="46"/>
 <result title="frequency" word="ECM" count="43"/>
 <result title="frequency" word="Biomaterials" count="36"/>
 <result title="frequency" word="heart" count="33"/>
 <result title="frequency" word="mechanical" count="31"/>
 ...
We can now explore all the word frequency results by going through them with a data mining script written with respect to what we are looking for.
Let’s try now to explore the regex functionality provided by ami. To do so, we need to create a .XML file which contains the regular expressions we will use.
For this case, I will use a simple file which finds all occurences of:
- “PCL” or “Polycaprolactone” or “polycaprolactone”
- “FDM” or “Fused Deposition Modeling” or “Fused deposition modeling” or “fused deposition modeling”
The file I will create has to be respect the following format:
<compoundRegex title="3DPCL">
<regex weight="1.0" fields="PCL">([Pp]olycaprolactone)</regex>
<regex weight="1.0" fields="PCL">(PCL)</regex>
<regex weight="1.0" fields="FDM">([Ff]used\s[Dd]eposition\s[Mm]odeling)</regex>
<regex weight="1.0" fields="FDM">(FDM)</regex>
</compoundRegex>
The weight parameter influences the relative importance given to each match (I kept it at 1 for now), while the regex-query itself is provided between () in each line.
This file should be saved in the folder of your project (in my case it is 3DPCL) and should be a .xml file. In my case, I named it pcl_fdm.xml. We can then use the regex plugin:
ilyass@ilyass-PC:~/Repositories/getpapers$ ami2-regex --project 3DPCL/ -i scholarly.html --r.regex 3DPCL/pcl_fdm.xml --context 40 60
--contextflag is convenient as it will provide each result us with 40 characters before the regular expression is found and 60 characters after it, allowing us to quickly evaluate how relevant each answer is
If we take a look at the results again after running the command:
3DPCL/
├── eupmc_fulltext_html_urls.txt
├── eupmc_results.json
├── pcl_fdm.xml
├── PMC4709372
│   ├── eupmc_result.json
│   ├── fulltext.pdf
│   ├── fulltext.xml
│   ├── results
│   │   ├── regex
│   │   │   └── 3DPCL
│   │   │       └── results.xml
│   │   └── word
│   │       └── frequencies
│   │           ├── results.html
│   │           └── results.xml
...
We now have results for our regex query too. If we open a result:
<?xml version="1.0" encoding="UTF-8"?>
<results title="3DPCL">
 <result pre="" name0="PCL" value0="PCL" post="is similar to PLA and PGA but it has a much slower" xpath="/html[1]/body[1]/div[2]/div[6]/p[2]"/>
 <result pre="ote osteoblast growth and maintain its phenotype, " name0="PCL" value0="PCL" post="scaffold has been used as a long-term implant in t" xpath="/html[1]/body[1]/div[2]/div[6]/p[2]"/>
 <result pre="981; Rich et al. 2002). However, the synthesis of " name0="PCL" value0="PCL" post="with other fast-degradable polymers can tune degra" xpath="/html[1]/body[1]/div[2]/div[6]/p[2]"/>
 <result pre="inting technologies [i.e. 3D printing (3DP)], and " name0="FDM" value0="FDM" post="are most widely used for the construction of tissu" xpath="/html[1]/body[1]/div[2]/div[6]/p[2]"/>
For each result, we get the context in the pre and post fields, the value0 and name0 which are related to the regex query we created and the xpath, which is the exact position of the sentence in the HTML tree of the ScholarlyHTML file attached to this article.
This result might seem a bit rough on the eyes, but .XML is a structured format which can be explored quite easily with python for example.
If you liked this post, you can share it with your followers or follow me on Twitter!
Merge/concatenate PDF files
A simple note post to remember how to concatenate 2 PDF files in an extremely easy way.
Simply : sudo apt-get install pdftk, then use it with:
pdftk file1.pdf file2.pdf cat output mergedfile.pdf
If you liked this post, you can share it with your followers or follow me on Twitter!
Compact citations with elsevier.cls document class
In a \documentclass{article} Latex document, the \usepackage{cite} will automatically compact your citations from [1, 2, 3, 4] to [1-4] for example (check here to learn more about it).
Now if you are using the \documentclass{elsarticle} to send your manuscript to an Elsevier journal, the previous solution does not work. The reason is that the elsarticle.cls class document is designed to work with natbib which uses the cite command and creates a conflict with \usepackage{cite}.
A solution to get your compacted citations to work without \usepackage{cite} is provided in the elsarticle class documentation, add the following line before the document’s end:
\biboptions{sort&compress}
PS: I tested everything with bibtex.
If you liked this post, you can share it with your followers or follow me on Twitter!
Read WiFi password in Win10
Click on the start button then type CMD.
Input the following line then press Enter:
netsh wlan show profile name="ENTER_SSID_HERE" key=clear
If you liked this post, you can share it with your followers or follow me on Twitter!
Yet Another Slack Tips and Tricks post
Formatting
Press the up arrow to edit your last message, then press Enter.
-
Bold:
*text* -
Italics:
_text_ -
~Strikethrough~:
~text~ -
Verbatim: insert the text in-between ` marks
Channels
You can mute any channel to stop getting notifications by typing /mute in the channel. Use it for channels that you only check from time to time. You will still be notified if someone directly mentions you.
You can leave a channel by typing /leave in the channel.
You can invite anyone to a channel simply by typing their username in that channel. You must then click on Invite.
Use the Do Not Disturb mode if you do not want to be disturbed at all for some time. Simply type /dnd 1 hour and you will not be bothered for the next hour.
To send a notification to all users in a channel, use @channel in your message. To send a notification to a specific user use @username. Use @here to send a notification to the presently active users in a channel (anyone using DND or absent will not be notified). Use @everyone to send a notification to every member of the team.
Set reminders
Get started with: /remind help
Typical usage: /remind me to Call Tamir next Thursday at 3PM
You will receive a reminder at Thursday 3PM that you can either mark as completed, or ask Slackbot to remind you again some other time. You can setup reminders for anyone in the same Slack team using their username instead of me. You will be noitifed by SlackBot once that person marks the reminder as complete.
Check you existing reminders by typing: /remind list
Other examples:
/remind me to drink water at 3pm every day
/remind @jessica about the interview in 3 hours
Tiny database
It is possible to setup custom SlackBot answers. These answers are triggered by specific keywords or sentences. Its most common usage is for the Wifi password. If a message contains both words wifi and password or key, then SlackBot should provide the WiFi key.
It can be used as electronic post-its to remember things…
Integrations or apps
A large number of apps or integrations are available for Slack. An integration either adds functionality to Slack or plugs it to other services.
The most common integration to expand functionality is Giphy; once installed, it is possible to type @giphy [text] in any channel to display a gif related to the [text] written.
Slack can also be connected to Github and Trello for example. In that case, any update in a Github repo will appear in a certain channel. Other users can immediately react and discuss the update, wether it is a Github update, a Trello one, Google Drive, etc…
If you liked this post, you can share it with your followers or follow me on Twitter!