

Compiling Peridigm 1.4.1 on Fedora 23
Thanks to Patrick Diehl, I have been working at the Bonn University, more precisely at the Institut für Numerische Simulation in order to develop some new tools to better explore some of my experimental results through the Peridynamics framework (writing it in italics because I am still not sure that it is what we are actually doing, welcome to Research). While I am there, Patrick guided me installing Peridigm on my machine. In this blogpost, I will re-write the steps to do so in such a way that it is clear even for someone who is not familiar with the Linux environment. If you are pretty familiar with the Linux environment, you should head toward Patrick’s blogpost, which is more for experienced users.
First, you need a Virtual machine sfotware if you are on Windows, then grab the image of Fedora 23. Create a new Virtual Machine and install Fedora on the VM.
Once your machine is installed and working, you need to install a few packages. To do so, open a terminal and type:
sudo dnf install mpich-devel mpich netcdf-mpich-devel netcdf-mpich hdf5-mpich-devel hdf5-mpich netcdf-fortran-mpich-devel boost-mpich-devel boost-mpich blas-devel blas lapack-devel lapack gcc-c++
DNF is the equivalent of apt-get from Ubuntu in Fedora.
You will also need to get a group of softwares. This is a great feature of DNF which will get and install a bunch of packages necessary for a certain field or usage, in this case, you will need to:
sudo dnf groupinstall "X Software Development"
Once you have the necessary packages, you will need to get an compile Trilinos on your machine. This guide considers that you are using Trilinos 12.6.2, you can get it here. Unpack Trilinos on your machine, and use the terminal to enter the unpacked folder. We are going to create a build folder inside it in order to compile it properly.
mkdir build && cd build
We will then need to load the previously installed mpich package, which is necessary for multiprocessor computations. We need it to compile Trilinos:
module load mpi/mpich-x86_64
Now, let’s create an empty text file in the previously created build folder and paste a list of instruction for the C compiler, explaining how it should actually compile Trilinos. This file should be called build.sh:
cmake \
-D CMAKE_INSTALL_PREFIX:PATH=/home/ilyass/trilinos-12.6.2-source \
-D CMAKE_CXX_FLAGS:STRING="-O2 -ansi -pedantic -ftrapv -Wall -Wno-long-long" \
-D CMAKE_BUILD_TYPE:STRING=RELEASE \
-D Trilinos_WARNINGS_AS_ERRORS_FLAGS:STRING="" \
-D Trilinos_ENABLE_ALL_PACKAGES:BOOL=OFF \
-D Trilinos_ENABLE_Teuchos:BOOL=ON \
-D Trilinos_ENABLE_Shards:BOOL=ON \
-D Trilinos_ENABLE_Sacado:BOOL=ON \
-D Trilinos_ENABLE_Epetra:BOOL=ON \
-D Trilinos_ENABLE_EpetraExt:BOOL=ON \
-D Trilinos_ENABLE_Ifpack:BOOL=ON \
-D Trilinos_ENABLE_AztecOO:BOOL=ON \
-D Trilinos_ENABLE_Amesos:BOOL=ON \
-D Trilinos_ENABLE_Anasazi:BOOL=ON \
-D Trilinos_ENABLE_Belos:BOOL=ON \
-D Trilinos_ENABLE_ML:BOOL=ON \
-D Trilinos_ENABLE_Phalanx:BOOL=ON \
-D Trilinos_ENABLE_Intrepid:BOOL=ON \
-D Trilinos_ENABLE_NOX:BOOL=ON \
-D Trilinos_ENABLE_Stratimikos:BOOL=ON \
-D Trilinos_ENABLE_Thyra:BOOL=ON \
-D Trilinos_ENABLE_Rythmos:BOOL=ON \
-D Trilinos_ENABLE_MOOCHO:BOOL=ON \
-D Trilinos_ENABLE_TriKota:BOOL=OFF \
-D Trilinos_ENABLE_Stokhos:BOOL=ON \
-D Trilinos_ENABLE_Zoltan:BOOL=ON \
-D Trilinos_ENABLE_Piro:BOOL=ON \
-D Trilinos_ENABLE_Teko:BOOL=ON \
-D Trilinos_ENABLE_SEACASIoss:BOOL=ON \
-D Trilinos_ENABLE_SEACAS:BOOL=ON \
-D Trilinos_ENABLE_SEACASBlot:BOOL=ON \
-D Trilinos_ENABLE_Pamgen:BOOL=ON \
-D Trilinos_ENABLE_EXAMPLES:BOOL=OFF \
-D Trilinos_ENABLE_TESTS:BOOL=ON \
-D TPL_ENABLE_Matio=OFF \
-D TPL_ENABLE_HDF5:BOOL=ON \
-D TPL_ENABLE_Netcdf:BOOL=ON \
-D TPL_ENABLE_MPI:BOOL=ON \
-D TPL_ENABLE_BLAS:BOOL=ON \
-D TPL_ENABLE_LAPACK:BOOL=ON \
-D TPL_ENABLE_Boost:BOOL=ON \
-D CMAKE_VERBOSE_MAKEFILE:BOOL=OFF \
-D Trilinos_VERBOSE_CONFIGURE:BOOL=OFF \
-D Netcdf_INCLUDE_DIRS=/usr/include/mpich-x86_64/ \
-D HDF5_INCLUDE_DIRS=/usr/include/mpich-x86_64/ \
..
It is important that you modify the second line of this file by changing the absolute path to the location where you unpacked Trilinos on your machine.
We will then change the authorization of the build.sh file to make it executable by your Linux user by typing chmod a+x build.sh and can configure the compilation of Trilinos by executing this file, just type: ./build.sh
The Cmake compiler will now configure Trilinos for compilation, it will take some time….
After that, we can finally install Tirlinos, by typing:
make -j
make install
This is also going to take some time, but after it, Trilinos will be installed on your machine. Congrats!
Next, we are going to compile Peridigm. We are directly going to pull the latest release of Peridigm from the Github repository of Peridigm. Go to your home folder by simply typing cd in the terminal, then input line after line:
git clone https://github.com/peridigm/peridigm.git
git fetch
git checkout release-1.4.1
You should now have a folder called peridigm in you home folder. We are now going to create a build folder in it (similar to what we did for Trilinos) to compile Peridigm:
cd peridigm
mkdir build
cd build
The next step is also similar to what we previously did with Trilinos, you will need to create a build.sh text file in the build folder and paste the following content in it:
cmake \
-D CMAKE_BUILD_TYPE:STRING=Release \
-D Trilinos_DIR:PATH=/home/ilyass/trilinos-12.6.2-source/lib/cmake/Trilinos/ \
-D CMAKE_C_COMPILER:STRING=/usr/lib64/mpich/bin/mpicc \
-D CMAKE_CXX_COMPILER:STRING=/usr/lib64/mpich/bin/mpicxx \
-D CMAKE_CXX_FLAGS:STRING="-O2 -Wall -ansi -pedantic -Wno-long-long -ftrapv -Wno-deprecated -std=gnu++11" \
..
Again, do not forget to change the absolute path on the third line of the previous script to the location where you installed Trilinos on your machine.
We can now configure the Cmake compiler by executing the build.sh file:
chmod a+x build.sh
./build.sh
Wait for it…. And you can then install Peridigm:
make -j
You should be done ! To execute Peridigm, you will need to type in your Terminal ./src/Peridigm when you are in the peridigm folder. And that’s it !
Now if you want to be able to run Peridigm from any folder in your machine, you need to modify your .bashrc to tell it where the Peridigm executable is:
cd
nano .bashrc
And add the following line at the end of the file:
export PATH=$PATH:/home/ilyass/peridigm/src/
Restart your terminal, and you’re done ! You can now type the Peridigm command anywhere in your temrinal and it will call out the software.
Many thanks to Patrick Diehl :)
If you liked this post, you can share it with your followers or follow me on Twitter!
3D printing the BirdFeeder by PrintedNest
Just sharing a timelapse of a 18 hours print. The part is the Bird Feeder v4, designed by Printed nest. The print was done on a Leapfrog Creatr, with a layer height of 0.3mm and 80% infill. The Printed Nest team recommends a 100% infill but I try to avoid printing solid parts on printers that are not equipped with an active cooling system (which is the case of the Leapfrog Creatr). Else it is necessary to print very slowly in order to let the previous solid layer cool down before laying the next one on it.
The filament I used is from the PLA Opaque Series. Affordable, no knots in the spool, it flows great, the color is good enough an they have several afety certificatons on their Material Saety Data Sheet. If you woul like t get some, take a look at 3D-TRIP or even more intereting prices around the Montreal area.
Link to the video
If you liked this post, you can
share it with your followers
or
follow me on Twitter!
Sleep with me podcast: Usefulness can always be found in uselessness
This is a Medium post. Click on the story to read it on Medium.
Sleep with me podcast: Usefulness can always be found in uselessness
If you liked this post, you can share it with your followers or follow me on Twitter!
Setup static IP wifi connection on Raspberry Pi
Last September, the jessie update for the Raspbian OS got out. It included a few updates that changes the way you have to set up your network. A clear method to setup a Raspberry Pi with a static IP on wifi is given here. The goal is to have a headless Raspberry Pi that automatically connects to one or several known WiFi networks.
In the previous version, most of the changes to the network configuration had to be done in the interfaces file, you can check its content:
pi@raspberrypi:~ $ cd /etc/network
pi@raspberrypi:~ $ cat interfaces
Which shows you the content:
# interfaces(5) file used by ifup(8) and ifdown(8)

# Please note that this file is written to be used with dhcpcd
# For static IP, consult /etc/dhcpcd.conf and 'man dhcpcd.conf'

# Include files from /etc/network/interfaces.d:
source-directory /etc/network/interfaces.d

auto lo
iface lo inet loopback

iface eth0 inet manual

allow-hotplug wlan0
iface wlan0 inet manual
    wpa-conf /etc/wpa_supplicant/wpa_supplicant.conf

allow-hotplug wlan1
iface wlan1 inet manual
    wpa-conf /etc/wpa_supplicant/wpa_supplicant.conf
You do not need to modify this file anymore. In order to get Wifi on your Raspberry Pi, you need a wireless USB adapter. Once you have one, just plug it and reboot your RPi. (I use this one)
You still need to provide the system with the SSID of your network and the password. You can do that here:
pi@raspberrypi:~ $ cd /etc/wpa_supplicant
pi@raspberrypi:~ $ sudo nano wpa_supplicant.conf
You need to add the following lines:
network={
    ssid="ESSID"
    psk="Your_wifi_password"
    key_mgmt=WPA-PSK
}
The real novelty is the use of dhcpcd to manage static connection. To set up a static IP for your Raspberry Pi, you need to modify the following file:
pi@raspberrypi:~ $ sudo nano /etc/dhcpcd.conf
Add the following lines, after adapting them to your network:
interface wlan0
     static ip_address=192.168.0.XXX
     static routers=192.168.0.1
     static domain_name_servers=192.168.0.1
If you do not have the information about your network, you can always check an already connected device’s settings (smartphone or laptop). You can now reboot your Raspberry Pi. It should automatically connect to the configured network, and reconnect (as soons as it is available again) if the connection is lost for any reason.
The next thing you should do is enable the SSH server in the Advanced settings of sudo raspi-config and you’re good to go !
If you liked this post, you can share it with your followers or follow me on Twitter!
Optical microscope Digital Image Correlation
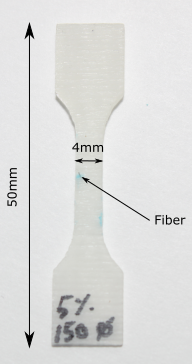
A small dogbone specimen containing one unique fiber is prepared in such a way that its surface provides a good enough level of grey in order to do Digital Image Correlation without the need of an additional speckle pattern. The purpose of the experiment is to evaluate the deformation field and observed damage mechanisms around the fiber (\(100 \mu m \) diameter) while the specimen is experiencing quasi-static tensile load.
|
The specimen is loaded in a microtraction machine adapted to perform the test under the microscope’s lens.
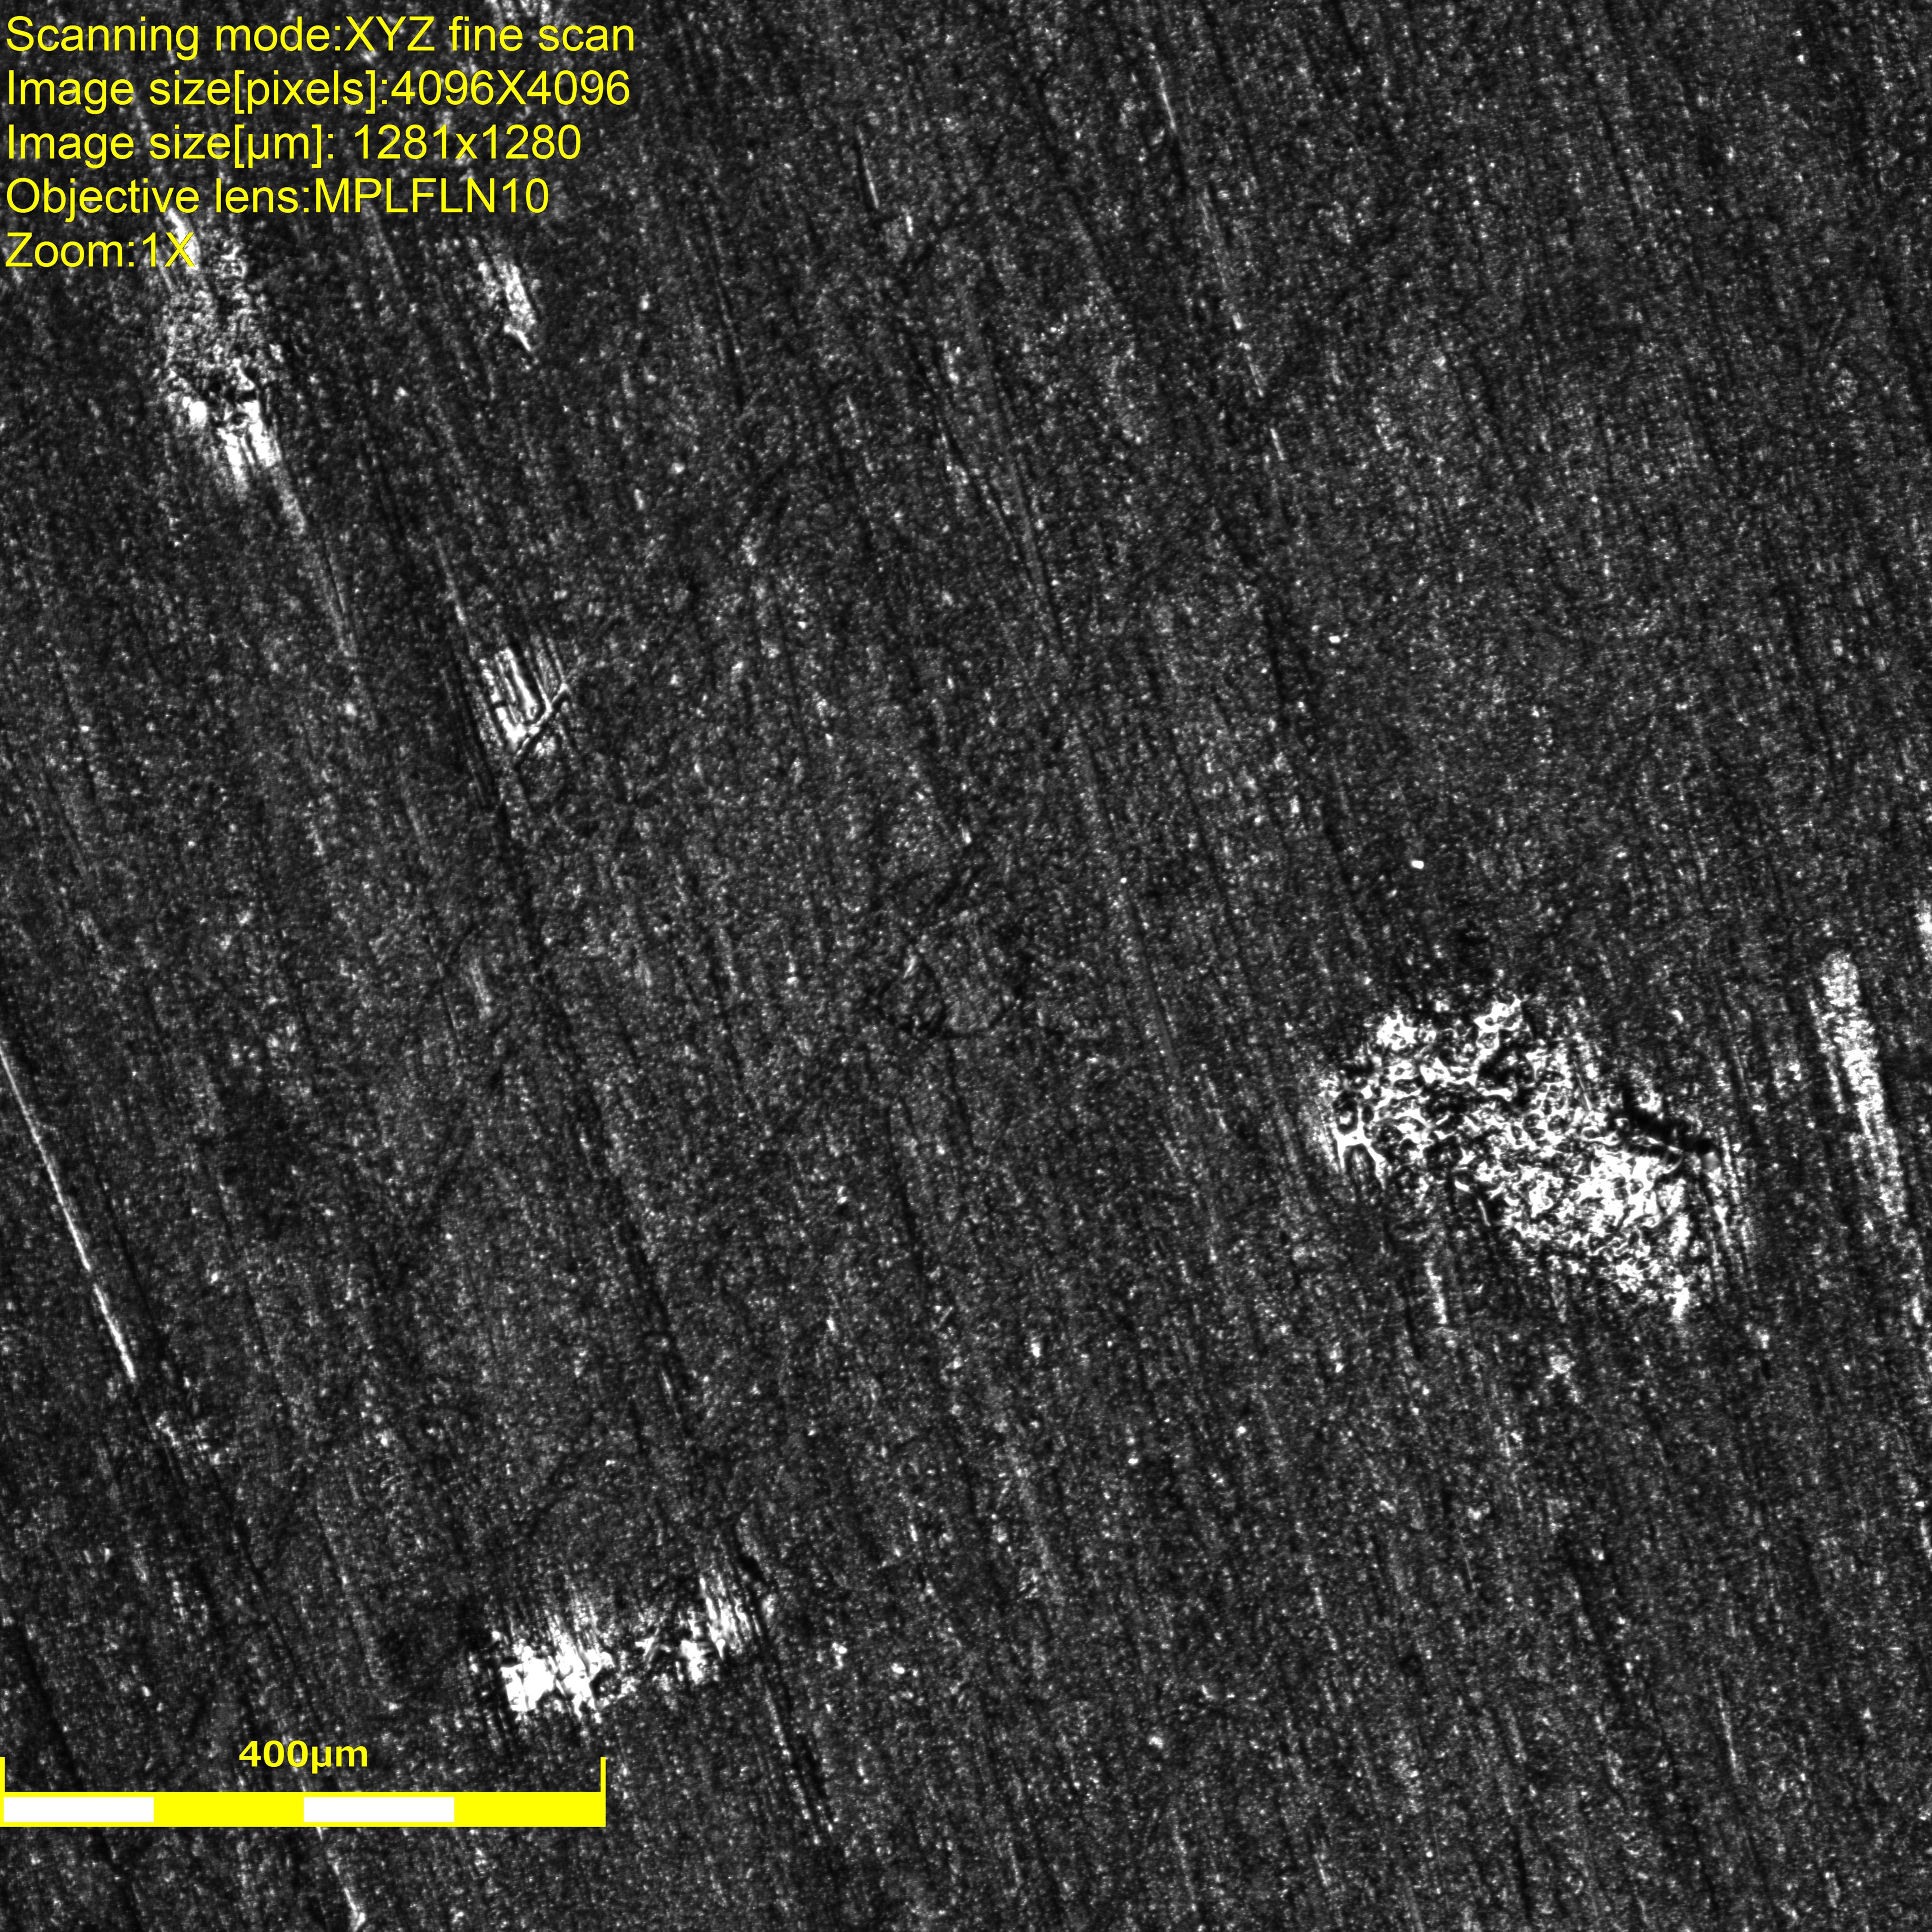
The test is stopped 8 times in order to take pictures using the amazing Olympus OLS4100 laser confocal microscope, it provides us with height information for each pixel and sweeps through a range of the z-height to provide a crisp clear definition at every corner of the picture.
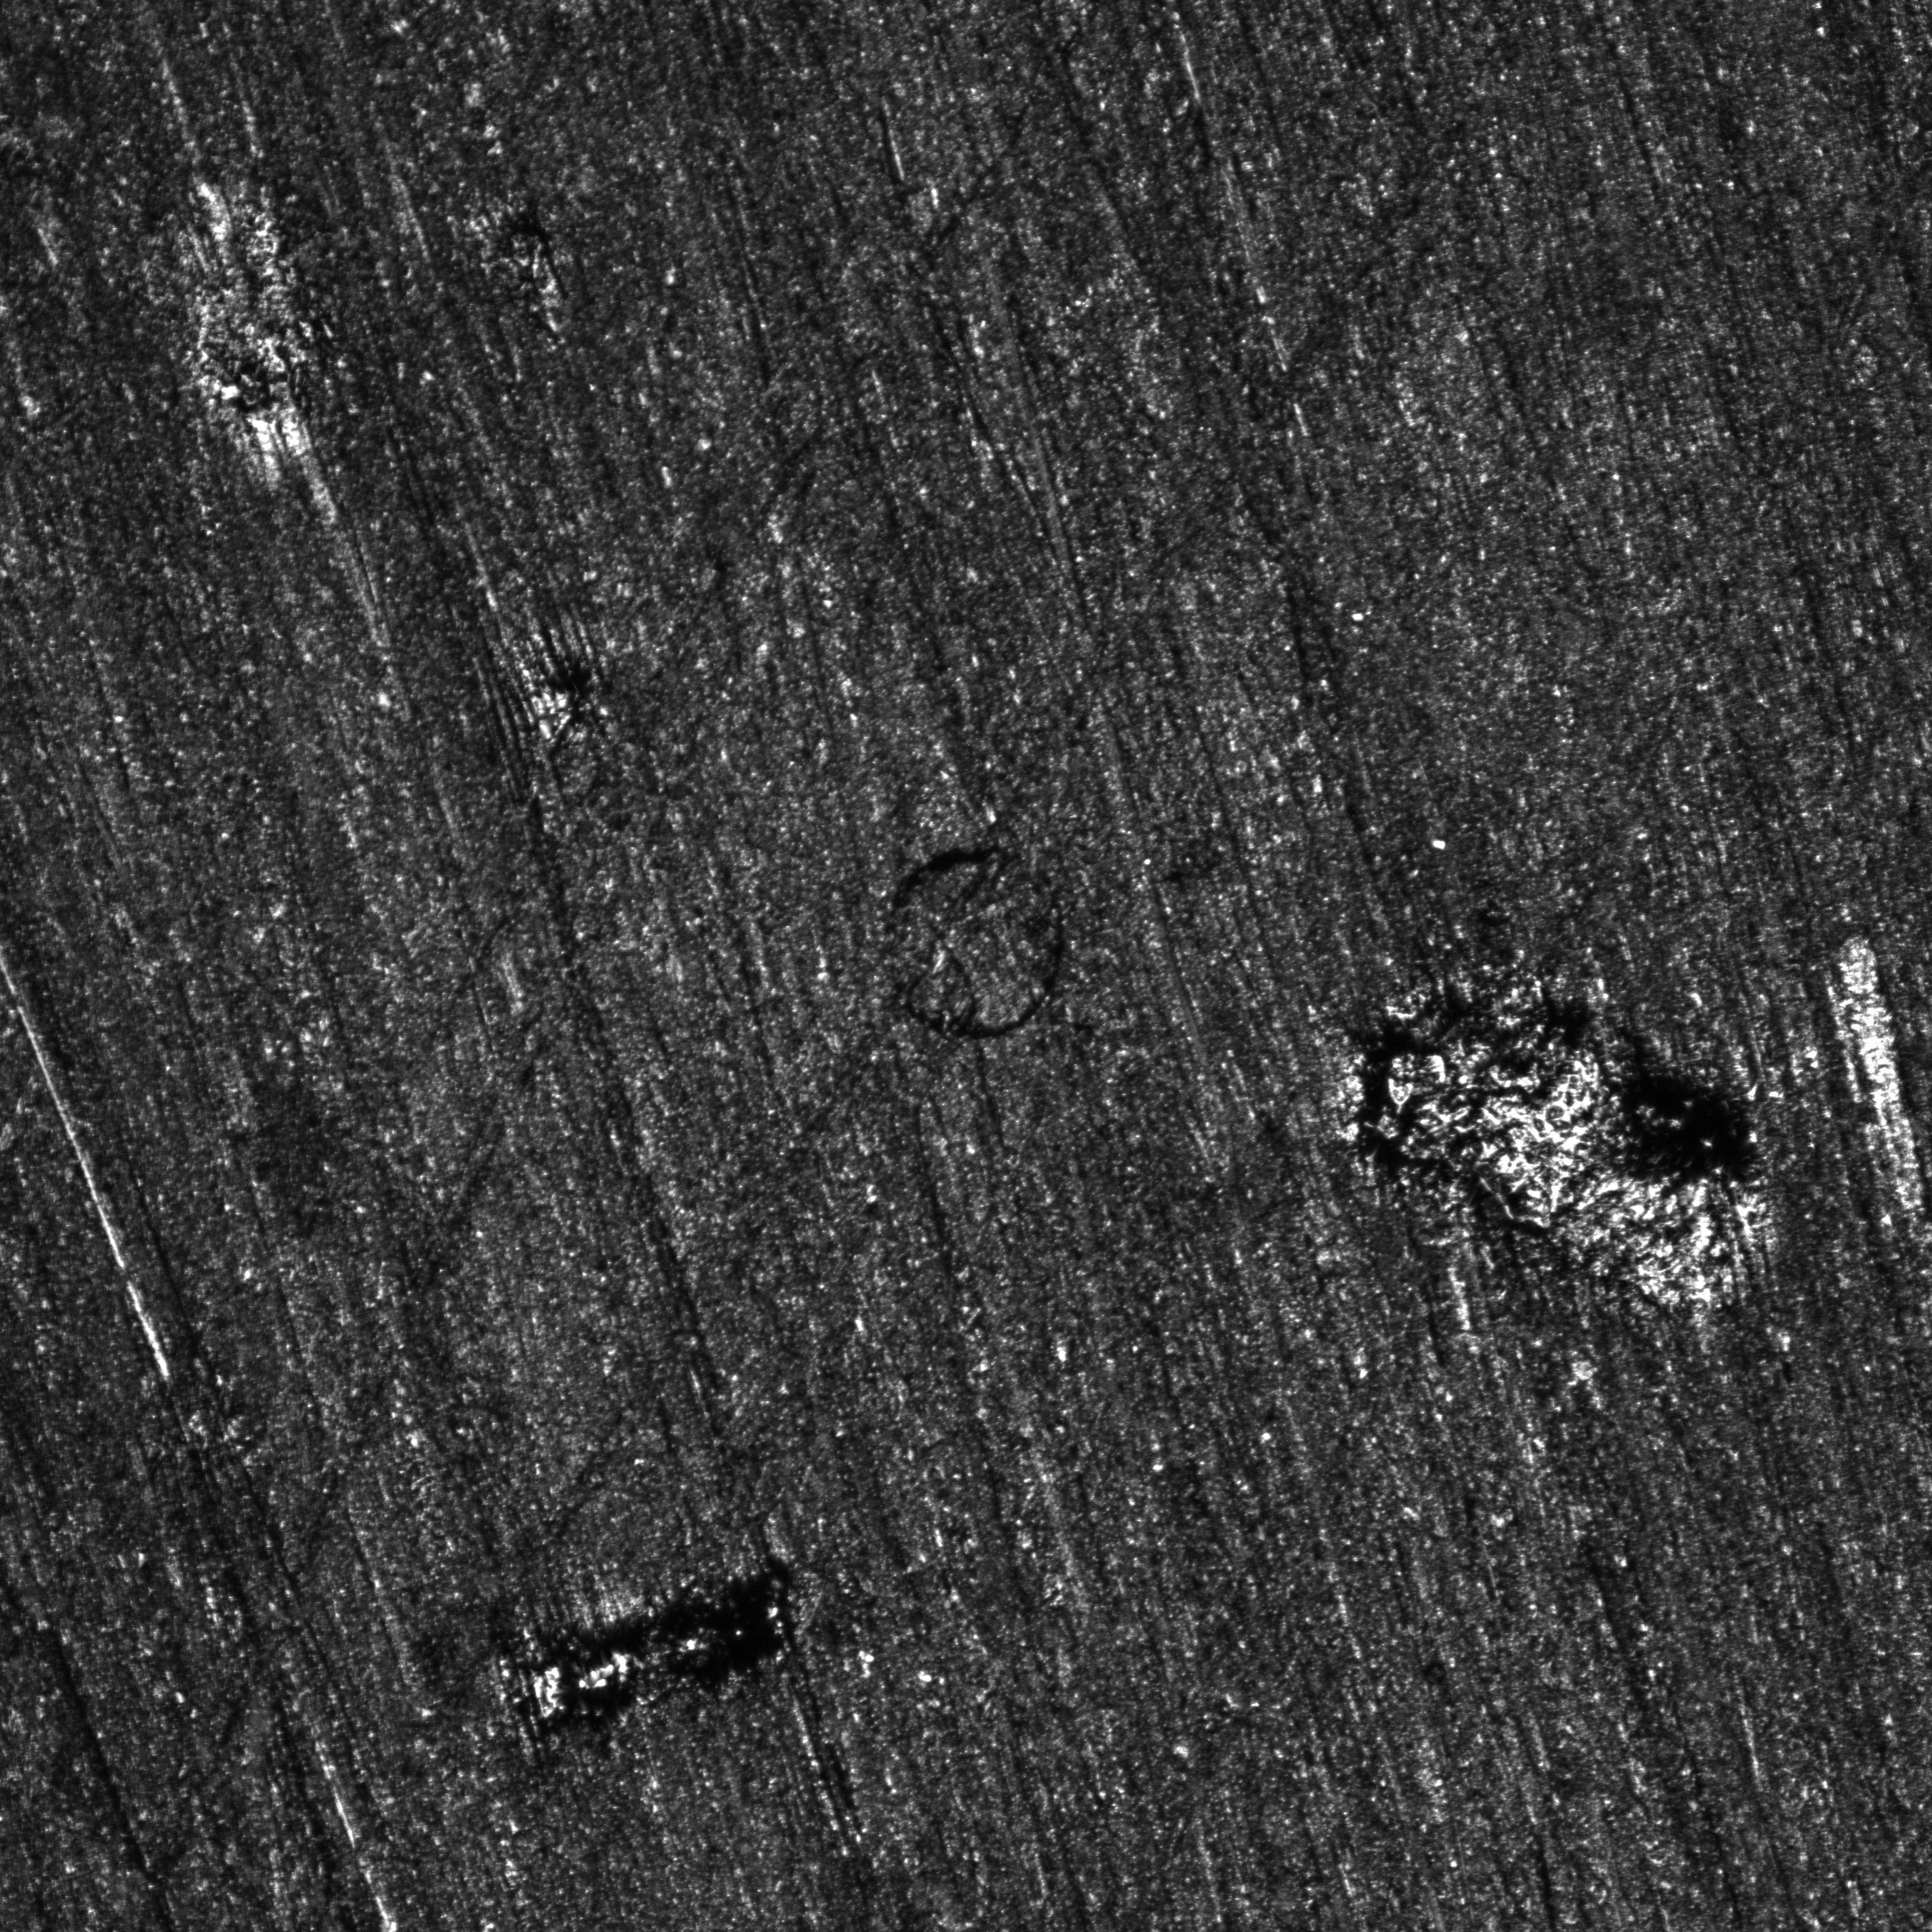
| First image | Final image |
|
|
On the first image, it is possible to distinguish the fiber but quite hard. We used the laser instead of white light to maximize pixels’ intensity. The white areas are actually reflecting the laser and will make the image correlation analysis impossible around those defects (glue? contamination? the specimen was cleaned though. EDIT: those are actually bubbles, voids, in the epoxy that are partially revealed by the polishing.).
On the final image, it is clearly possible to see that the fiber completely detached from the matrix. The material also seems to have shifted along the \(45^o\) line passing through the fiber. The white areas’ shapes and colors also changed erathically, which is why they cannot be considered in the region of interest during the analysis.
These experiments were possible with the help of Damien Texier and were done at École de Technologie Supérieur, Montréal.
If you liked this post, you can share it with your followers or follow me on Twitter!
Gmsh to Exodus converter
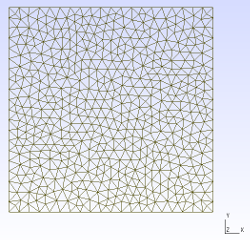
At the USNCCM13, we discussed the fact that (currently) Peridigm only accepts Exodus II mesh files. The only software that generates Exodus II mesh files is the powerful Cubeit. Cubeit’s license can also be expensive, especially for someone who only wants to use the conversion to Exodus II feature to import geometries in Peridigm… Patrick discussed the possibility of writing our own conversion script that converts a widely used free meshing format to Exodus II. We eventually decided to use Gmsh as an input for our script, which then converts Gmsh meshes to Exodus II.
The code is available here, everything is written in python so the only requirement is VTK >=5.8 with the python wrapper (sudo apt-get install python-vtk). We currently support triangles and quadrangles for 2D elements and tetrahedrons for 3D elements.
Examples
2D
| Mesh generated with gmsh | Exodus geometry visualized with paraview |
|
|
3D
| Mesh generated with gmsh | Exodus geometry visualized with paraview |
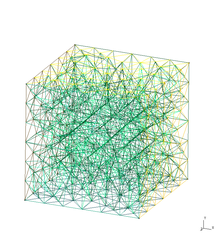
|
|
Get started
-
Let us know if you have any troubles using it
-
Think it could be better? Clone the repo, improve it and send a pull request
It was great working with Patrick on this project, I learned a lot about meshes and VTK. #notscaredofmeshesanymore
If you liked this post, you can share it with your followers or follow me on Twitter!
Epoxy dogbone specimen with steel fibers embedded, manufacturing and qualitative residual stress evaluation
A 3D-printed mold was designed to hold 6 steel fibers (basically steel wire of 900\(\mu m\) arranged in two parallel lines of 3 fibers. The drawings show the side and front view of the mold, the red line represents one unique fiber. It is attached to the bottom of the mold using hooks that are directly 3D-printed in the mold.
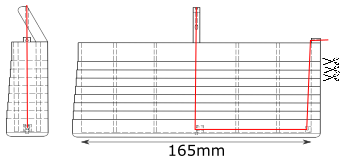
Epoxy is then poured in the mold and cures around the fibers. The mold is then horizontally cut (following the scissor lines on the drawing) to provide several dogbone specimen, containing transversally embedded steel fibers. Click on the picture and move your mouse around to change the focus point and perspective.
One of the specimens was polished, then covered with light polarizing film on the front and back to reveal the photoelastic properties of Epoxy. If you ever need polarizing film, you can either buy some but it is quite hard to find large sheets. You can also get high quality filters by taking an old LCD computer monitor apart (that is what I did here), it is an easy operation that still needs you to be slightly careful (a tutorial to do so). Other surfaces were covered with black ink (Sharpy) to avoid non-polarized light diminushing the contrast of polarized light. It is then possible to qualitatively see the residual stresses in the specimen due to cooling after curing and the mismatch of coefficient of thermal expansion between the fibers and the matrix.
The density of fringes (isolines of same colours) qualitatively shows the stress concentration. The more colours there are in an area, the higher the stress concentration is. It is possible to distinguish the residual stresses due to the interaction with the mold and the residual stress around each fiber.
If you liked this post, you can share it with your followers or follow me on Twitter!